AndroidDev

坚持比完美更重要

Android的消息机制-Handler

本文总结一下Android消息机制Handler的一些内部实现原理。Handler在我们Android开发中经常用来切换UI线程和Worker线程,详细了解其内部的实现原理之后,会更加明白其实现的机制,更加灵活地使用。

为什么需要切换UI/Worker线程?

Android规定所有的UI操作必须在主线程中完成,又建议不要在主线程中进行耗时的操作,否则就会产生ANR异常。所以,我们在进行一些耗时操作时,必须开一个子线程进行此类操作,如果需要在子线程中访问UI资源,那么就需要切换到主线程进行UI操作。

ViewRootImpl中对UI的操作进行了验证:

1
2
3
4
5
6
void checkThread() {
        if (mThread != Thread.currentThread()) {
            throw new CalledFromWrongThreadException(
                    "Only the original thread that created a view hierarchy can touch its views.");
        }
    }

这类错误在新手接触Android开发肯定遇到过,就是在子线程操作UI导致的。

那么,Android为什么那么蛋疼地要求一定要在UI线程中进行UI操作呢?

这是因为Android的UI操作是非线程安全的,如果多个线程并发操作UI,可能会导致UI出于某种不可控的状态(可以理解为Google程序员解决不了多线程并发的问题 0-0,如果加上锁的机制来控制并发问题又会导致代码设计、效率问题),所以Android便采用了单线程模型,只能在主线程中操作UI.

Handler消息机制模型

handlermodule

上图是Handler能够进行线程切换的模型图,在Thread#1中发出的Message添加到Thread#2中对应的消息队列中,然后Thread#2中的Looper不断循环取出Message,在Thread#2中调用相关逻辑,完成两个线程间的切换。

图中包含了我们需要关心的所有对象,Handler、Looper、MessageQueue。

Handler

暴露给我们用来切换线程的上层接口,提供了一系列send、post方法,用来发送Message。

Looper

线程切换的关键,内部维护一个消息队列,该对象以阻塞的方式不断从MessageQueue中读取消息,然后在当前线程(要切换的线程)执行消息所代表的逻辑。

MessageQueue

消息队列,用来存放Message。其实现是单链表数据结构,方便插入和删除。

Handler消息机制源码分析

以上介绍了Handler机制的几个重要组成部分,究竟它们是怎么组合在一起,完成Android中重要的消息机制的呢,我们通过源码来进行分析,这一部分代码非常清晰!

我们在开发中切换到UI线程的常规做法就是,在最外层实例化一个Handler子类对象,重写handleMessage方法,等待子线程发过来的message,然后对应message进行不同的UI操作。很显然,要看透这一套系统,把它们之间的关系理清,就要从Handler的构造方法开始看起啦,这是我们能看到的入口。

Handler构造方法很多,我们从无参构造方法进入,调用到另一个有参构造方法:

1
2
3
4
5
6
7
8
9
10
11
public Handler(Callback callback, boolean async) {
        ...
        mLooper = Looper.myLooper();
        if (mLooper == null) {
            throw new RuntimeException(
                "Can't create handler inside thread that has not called Looper.prepare()");
        }
        mQueue = mLooper.mQueue;
        mCallback = callback;
        mAsynchronous = async;
    }

一眼望去就看到了我们的Looper(mLooper)大哥哥和MessageQueue(mQueue)大姐姐!

继续看Looper.myLooper()的实现:

1
2
3
4
static final ThreadLocal<Looper> sThreadLocal = new ThreadLocal<Looper>();
public static Looper myLooper() {
        return sThreadLocal.get();
    }

炒鸡简单,直接通过sThreadLocal.get()便得到了Looper对象。那么这里ThreadLocal又是什么东西,怎么从它里面就可以得到Looper对象呢。

其实ThreadLoal是一个很巧妙的类,通过它可以往指定的线程中存储数据,只有在指定的线程中可以获得存储的数据,类似于一个HashMap的结构(Key是某个线程),但是其内部的实现完全不是HashMap,可以抽象地理解为ThreadLocal是一个以线程为作用域的HashMap。可以深入ThreadLocal查看其具体实现,这里就不详细讨论了。

ThreadLocal在这里的使用场景是用来保存每个线程的Looper对象(泛型为Looper)的,通过ThreadLocal#set(Looper)保存当前线程的Looper对象,然后需要的时候通过ThreadLocal#get()取出来用。

在Handler构造方法中可以看到,如果mLooper==null,则会抛出异常提示“Can’t create handler inside thread that has not called Looper.prepare()”. 那么这样看来我们创建Looper对象实例,然后set进ThreadLocal就是在所谓的Looper.prepare()中进行的了~。

验证:

1
2
3
4
5
6
private static void prepare(boolean quitAllowed) {
        if (sThreadLocal.get() != null) {
            throw new RuntimeException("Only one Looper may be created per thread");
        }
        sThreadLocal.set(new Looper(quitAllowed));
    }

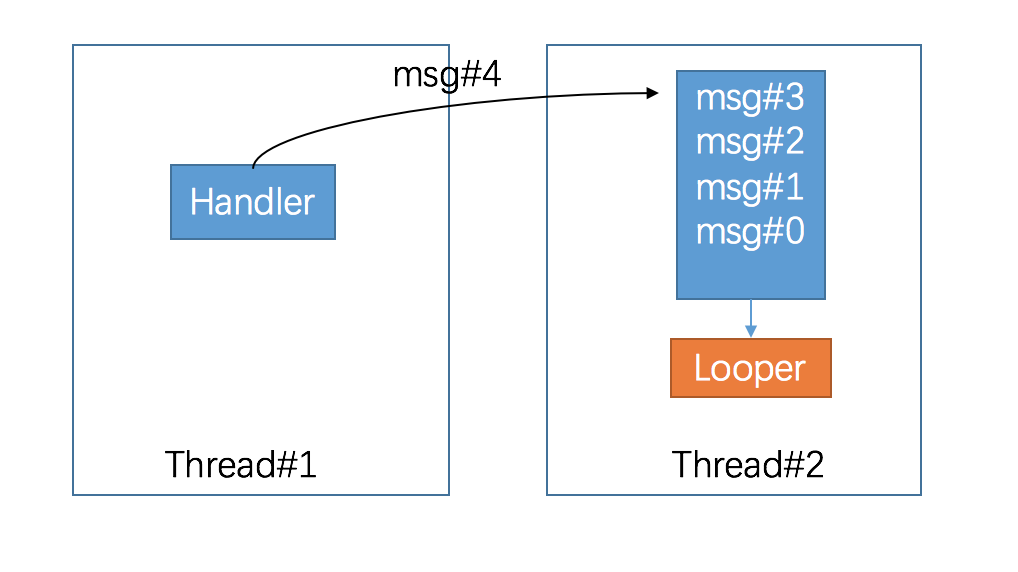
嗯,如此的完美,并且还有友好的提示,如果ThreadLocal中已经设置过Looper则抛出异常"Only one Looper may be created per thread",所以我们可以得出一个结论:一个线程只拥有一个Looper对象

问题来了,我们在主线程中创建Handler的时候并没有看到有调用过Looper.prepare方法呀,它是什么时候调用来初始化Looper的,于是我们就要进入framework的ActivityThread类中寻找答案了。

1
2
3
4
5
6
7
8
9
10
11
12
13
14
15
16
17
18
19
20
21
22
23
public static void main(String[] args) {
        ...

        Looper.prepareMainLooper();

        ActivityThread thread = new ActivityThread();
        thread.attach(false);

        if (sMainThreadHandler == null) {
            sMainThreadHandler = thread.getHandler();
        }

        AsyncTask.init();

        if (false) {
            Looper.myLooper().setMessageLogging(new
                    LogPrinter(Log.DEBUG, "ActivityThread"));
        }

        Looper.loop();

        throw new RuntimeException("Main thread loop unexpectedly exited");
    }

真相只有一个,我们在主线程的main入口方法中可以看到Looper.prepareMainLooper方法,这个方法跟prepare类似,只是加了一点特殊的地方:

1
2
3
4
5
6
7
8
9
10
11
12
13
14
15
16
17
18
19
20
21
22
23
/**
     * Initialize the current thread as a looper, marking it as an
     * application's main looper. The main looper for your application
     * is created by the Android environment, so you should never need
     * to call this function yourself.  See also: {@link #prepare()}
     */
    public static void prepareMainLooper() {
        prepare(false);
        synchronized (Looper.class) {
            if (sMainLooper != null) {
                throw new IllegalStateException("The main Looper has already been prepared.");
            }
            sMainLooper = myLooper();
        }
    }

    /** Returns the application's main looper, which lives in the main thread of the application.
     */
    public static Looper getMainLooper() {
        synchronized (Looper.class) {
            return sMainLooper;
        }
    }

我们可以直接通过getMainLooper来获得主线程拥有的那个Looper了,Handler有个构造方法可以接受一个Looper,我们可以把MainLooper传进去,就可以将消息send到MainLooper维护的MessageQueue中,来完成到主线程的切换了。

在main方法的最后我们可以看到调用了Looper.loop()方法,这里开始循环读取msg,在当前线程执行逻辑了。

1
2
3
4
5
6
7
8
9
10
11
12
13
14
15
16
17
18
19
20
21
22
23
24
25
26
27
28
29
30
31
32
33
34
35
36
37
38
39
40
41
42
43
44
45
46
47
48
49
50
 /**
     * Run the message queue in this thread. Be sure to call
     * {@link #quit()} to end the loop.
     */
    public static void loop() {
        final Looper me = myLooper();
        if (me == null) {
            throw new RuntimeException("No Looper; Looper.prepare() wasn't called on this thread.");
        }
        final MessageQueue queue = me.mQueue;

        // Make sure the identity of this thread is that of the local process,
        // and keep track of what that identity token actually is.
        Binder.clearCallingIdentity();
        final long ident = Binder.clearCallingIdentity();

        for (;;) {
            Message msg = queue.next(); // might block
            if (msg == null) {
                // No message indicates that the message queue is quitting.
                return;
            }

            // This must be in a local variable, in case a UI event sets the logger
            Printer logging = me.mLogging;
            if (logging != null) {
                logging.println(">>>>> Dispatching to " + msg.target + " " +
                        msg.callback + ": " + msg.what);
            }

            msg.target.dispatchMessage(msg);

            if (logging != null) {
                logging.println("<<<<< Finished to " + msg.target + " " + msg.callback);
            }

            // Make sure that during the course of dispatching the
            // identity of the thread wasn't corrupted.
            final long newIdent = Binder.clearCallingIdentity();
            if (ident != newIdent) {
                Log.wtf(TAG, "Thread identity changed from 0x"
                        + Long.toHexString(ident) + " to 0x"
                        + Long.toHexString(newIdent) + " while dispatching to "
                        + msg.target.getClass().getName() + " "
                        + msg.callback + " what=" + msg.what);
            }

            msg.recycle();
        }
    }

读取消息这一块没什么说的,内部有一个死循环一直在阻塞读取消息队列中的数据,然后通过msg.target.dispatchMessage(msg); 调用到目标handler中去。于是,不管msg来自哪个线程,最终的逻辑处理都会切换到Looper.loop()执行所在的线程中。diapatchMessage分发消息源码如下:

1
2
3
4
5
6
7
8
9
10
11
12
13
14
15
/**
     * Handle system messages here.
     */
    public void dispatchMessage(Message msg) {
        if (msg.callback != null) {
            handleCallback(msg);
        } else {
            if (mCallback != null) {
                if (mCallback.handleMessage(msg)) {
                    return;
                }
            }
            handleMessage(msg);
        }
    }

从中也可以得到一些有用的信息,其实我们平常写的handleMessage()是在第三种情况才会调用到的。第一种情况是Handler#post(Runnable),msg.callback就是runnable对象。第二种情况是在构造方法中可以传一个Callback对象,用在有些情况下,不想继承Handler实现一个子类重写handleMessage,可以直接传此参数完成回调。

完结

整个Handle消息机制就是这样,逻辑上非常清晰,以后写Handler的时候,脑子就更加清晰,它们的整个流程关系是怎样了,说不定还可以解决一些模糊的问题,知其然所以然了~

大家也许会明白在子线程使用Handler要做的几个步骤的所以然了(还记得刚入门Android时死记的…)

1
2
3
4
5
6
7
8
9
new Thread(){
      @Override
      public void run() {
          super.run();
          Looper.prepare();
          Handler myHandler = new Handler();
          Looper.loop();
      }
  }.start();

参考

《Android开发艺术探索》一书

Android源码

发表评论